Aquascaping a nano tank is the art of building a believable underwater landscape inside roughly 10 to 60 litres of water, where every centimetre of hardscape, slope, and planting reads at close range. The honest truth from my bench: small water makes a scape harder, not easier. There is nowhere for a clumsy rock or a wrong-scale plant to hide.
I came to aquariums through years of hydroponics, where water chemistry is logged daily and guessing kills plants instead of fish. That habit changed how I scape. I treat a layout the way I treat a nutrient reservoir: plan it, isolate the variables, and write the numbers down. This nano aquascape guide is the map for the whole cluster — styles, hardscape, substrate depth, planting zones, planning, low-maintenance builds, and the tools that make small-scale work possible. Each section links to the deep-dive that earns its own page.
Why Nano Aquascaping Is the Advanced Class, Sold as Beginner
A 20-litre tank is not a forgiving 200-litre tank shrunk down. The same handful of plants, the same fist of rock, now fill a third of the visible water. Proportion errors that vanish in a big aquarium scream in a nano. In my parameter log the chemistry punishes small volume the same way — a single rock that leaches carbonate moves KH faster in 20 litres than it ever would in 200.
So nano aquascaping is two disciplines at once: composition (does it look like a real place?) and chemistry (does the hardscape and substrate keep your water where your livestock needs it?). Most beginner content covers neither honestly. It sells you a “easy planted tank” kit and leaves out that the carpet plant in the photo needs CO2 and that the pretty grey stone quietly hardens your water. I scape on the high-tech 60L rimless I aquascaped by hand and a low-tech 20L that has held a shrimp colony for years, and the difference between them is the difference between “looks good in a week” and “still looks good in two years.”
The Aquascaping Styles That Actually Fit a Nano
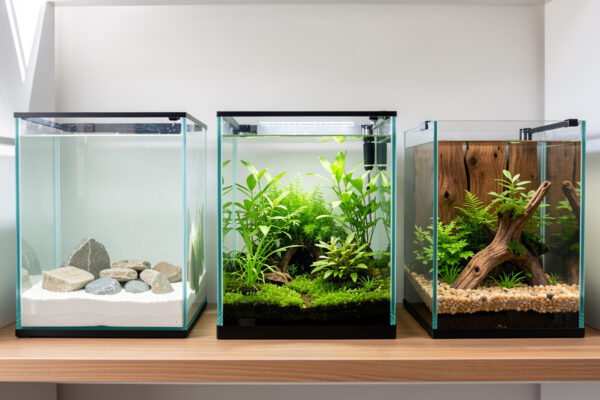
Three layout styles translate well to small water: the Iwagumi (stone-only, minimalist), the nature/jungle style (plant-led, lush), and the hardscape-driven “wood-and-epiphyte” scape that I lean on for low-maintenance builds. Dutch-style flower-bed scaping rarely works in a nano — it needs length and many species to read correctly. Choosing a style first is the single decision that makes every later choice easier.
Each style sets your stocking, your maintenance load, and your hardscape shopping list before you buy a single rock. An Iwagumi lives or dies on stone placement and a flawless carpet; a wood-and-epiphyte scape forgives almost everything. I break all of this down, with a style-by-difficulty table and real photos of what each demands, in the dedicated guide.
| Style | Best Nano Size | Skill Level | Maintenance | Needs CO2? |
|---|---|---|---|---|
| Iwagumi (stone only) | 20-60 L | Hard | High (carpet trimming) | Usually yes |
| Nature / jungle | 20-60 L | Medium | Medium-high | Helpful, not required |
| Wood & epiphyte | 10-60 L | Easy | Low | No |
| Dutch flower-bed | Poor in nano | Hard | Very high | Yes |
Read the full breakdown in my guide to aquascaping styles for nano tanks before you commit, because the style you pick dictates everything below.
Hardscape First: Rock and Wood Are the Skeleton
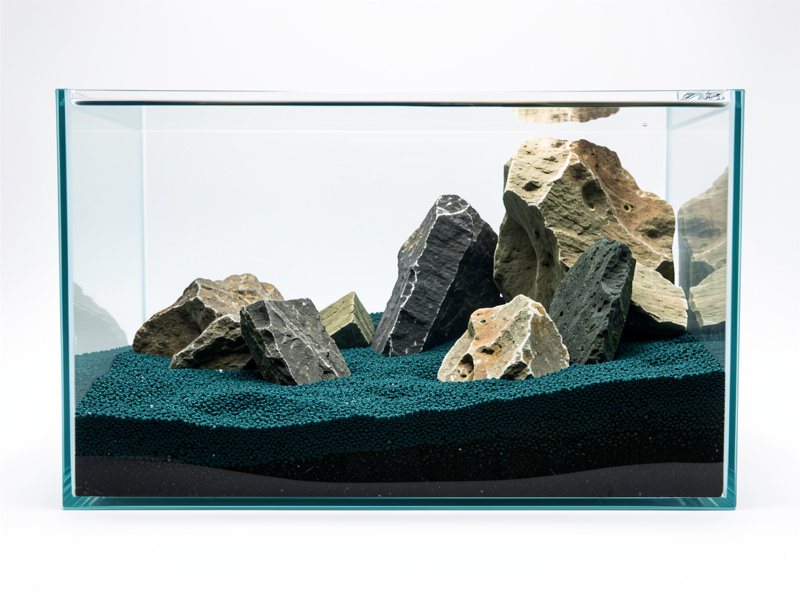
The single biggest improvement most nano scapes need is to set the hardscape before touching a plant. Rock and wood are the bones; plants are skin. A scape with a strong stone or wood structure looks finished even before it grows in, and a scape without one stays a green blur no matter how well the plants do. In a nano the structure has to do more work because there is so little of it.
Here is where my chemistry background earns its keep. Hardscape is not decoration — it is a reagent. Seiryu stone and most pale “limestone-look” rocks dissolve carbonate and raise KH and GH; I have watched a single Seiryu piece pull a soft-water shrimp tank up two degrees of KH over a month in my log. Dragon stone (Ohko) and lava rock are close to inert. Spider wood and Malaysian driftwood leach tannins and stain the water amber for weeks. None of that is a dealbreaker — it is a choice you make on purpose, matched to the livestock you intend to keep. My hardscape rock and wood guide covers selection, the chemistry of each material, and how to build a structure that reads as a real cliff or root system at nano scale.
Substrate Depth and Slope Build the Illusion of Space
A flat substrate makes a nano look like a flat box. The oldest trick in aquascaping is the back-to-front slope: shallow at the glass, deep at the back. That single gradient fakes depth the human eye cannot resist, and it gives root-feeding plants the bed they need at the back where the tall stems live. This guide cluster keeps substrate depth and slope separate from substrate type and chemistry, which lives in its own cluster — here we care about how deep and how steep.
My working numbers: roughly 2-3 cm at the front glass rising to 5-8 cm at the rear for a 30-45 cm nano, more if you want a dramatic mountain. Carpeting plants need about 3 cm minimum to anchor; epiphytes need none because they live on hardscape. Slopes slump over time, so I terrace them behind rock and wood to hold the grade. The full method, with the depth-by-zone numbers I actually use, is in the substrate depth guide for planted nanos.
Planting in Zones: Foreground, Midground, Background
Plants are placed in three depth zones, and matching plant height to zone is what separates a designed scape from a salad. Foreground plants stay under about 5 cm and carpet the open front; midground plants (often epiphytes on hardscape) fill the structure; background stems and tall species hide equipment and frame the focal point. Get the zones wrong — a tall stem in the foreground — and the illusion of space collapses instantly.
In a nano the zones are compressed, so plant choice matters more than in a big tank. I lean on slow epiphytes (Anubias nana ‘petite’, Bucephalandra, Java fern) for the midground because they hold their scale and never outgrow the layout, and I reserve fast stems for the background where I can trim hard. My foreground, midground and background planting guide gives the exact species I run by zone and the spacing that fills in without crowding.
Composition: Rule of Thirds, Focal Point, Negative Space
Good scapes are not symmetrical. Place your main rock or wood — the focal point — about a third of the way across the tank, never dead centre, and leave open water or open carpet as negative space so the eye has somewhere to rest. In a nano, negative space is the hardest thing to keep, because the temptation is to fill every gap. Resisting that is the whole game.
Two more rules I follow on every build: odd numbers (three rocks read better than two or four), and a single dominant direction so the scape “leans” one way like a wind-shaped landscape. These are not my inventions — they are borrowed from photography and landscape painting, and they work underwater because the eye is the eye. I plan all of this dry before I add water, which is its own discipline.
Plan the Scape Before You Get Wet
Every scape I have been happy with was planned dry and most I rushed I tore down. Planning means sketching the layout, dry-fitting the hardscape in the empty tank, photographing it, sleeping on it, and only then committing substrate and water. It is the cheapest insurance in the hobby — moving a rock on paper costs nothing; moving it after you have planted around it costs a weekend. My nano aquascape planning guide walks the whole pre-water process, from measuring the footprint to staging the hardscape.
Low-Maintenance vs High-Tech: Be Honest About Which You Want
The prettiest nano scapes on the internet are high-tech: pressurised CO2, high PAR light, dosed ferts, and a maintenance schedule that does not forgive a missed week. They are a genuine hobby, and I run one on my 60L. But most people asking how to aquascape a nano want a tank that looks good and does not run their life. That is a different design from the first rock onward — inert hardscape, epiphytes and slow plants, modest light, no CO2.
You decide this before you build, not after, because a low-maintenance scape is a deliberate set of choices, not a high-tech scape you neglect. A neglected high-tech tank becomes an algae farm; a well-designed low-tech tank just keeps looking like itself. I lay out the exact low-effort plant and hardscape palette in my low-maintenance nano aquascaping guide, and the CO2 question gets its own cluster if you decide to go the other way.
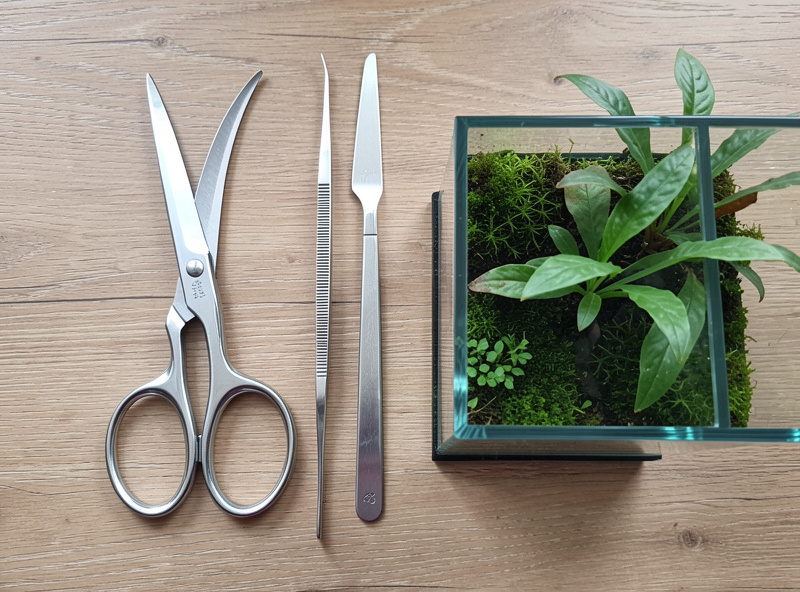
The Tools That Make Small-Scale Work Possible
You cannot plant a 2 cm carpet plant in a nano with your fingers, and a kitchen scissors will shred stem tips. Nano aquascaping needs a small, specific kit: long curved and straight tweezers for planting and placement, spring-loaded curved scissors for trimming carpets without disturbing the substrate, a substrate spatula for levelling and slopes, and an algae scraper sized for thin glass. Good tools are the difference between a tidy scape and a churned-up mess.
This is the one area where I tell people to spend a little — not on the most expensive set, but on tweezers and scissors that hold an edge and a point. My full kit, what each piece does, and the sane budget order to buy them in is in the aquascaping tools guide for nano tanks.
Common Nano Aquascaping Mistakes I See Most
The mistakes repeat. Symmetry (a rock on each side, mirror-image planting) kills the natural look. Filling every gap leaves no negative space and no place for the eye to rest. Using too few, too-small rocks so the structure disappears once plants grow. And the chemistry one that catches shrimp keepers: choosing a beautiful pale stone that turns out to be carbonate-rich and slowly hardens water meant to stay soft.
The fixes are all upstream — they are decisions made before water goes in. Pick a style, build a strong asymmetric hardscape, slope the substrate, plant by zone, and match every material to your target chemistry. None of it is hard once it is planned; all of it is painful to fix once it is grown in. That is why this whole cluster front-loads the thinking. A nano scape is a small system run on purpose, the same as every other tank on my rack — and like every system, it rewards the keeper who measures over the one who guesses.
Light and Flow: The Invisible Half of a Scape
A scape is hardscape, plants, and two things you cannot see in a photo: light and flow. Both are part of the design, and both are easier to get wrong in a nano because the margins are so small. Light drives plant growth and, when it is too strong for the plant mass present, drives algae instead. On a new low-tech nano I start at a modest photoperiod — around six hours — and only lengthen it once the plants are established and outcompeting algae for nutrients. A high-PAR light over a sparsely planted tank is an algae generator, not a feature.
Flow is the half nobody thinks about until they have a dead spot. Plants and hardscape need gentle, even circulation to carry nutrients and CO2 to leaves and to keep detritus from settling in stagnant corners where it feeds blackbeard algae. In a nano the filter return is usually the only flow source, so aim it to sweep the whole footprint without blasting the carpet flat. I judge it by watching fine plant tips — they should sway, not thrash. Get light and flow right and the scape stays clean; get them wrong and you fight algae forever. My nano lighting guide covers photoperiod and intensity in detail, and controlling algae with plants and flow covers the circulation side.
How a Nano Scape Grows In: The First Three Months
A freshly planted nano does not look like the photo on day one, and the people who panic and tear it down miss the best part. The first three months follow a predictable curve, and knowing it stops you from “fixing” things that are just the tank settling. Week one to three is the ugly phase: diatoms (brown dust algae) bloom on glass and hardscape because the new substrate and fresh light are feeding silica and excess nutrients faster than anything can use them. This is normal and temporary — I let it run and clean glass, rather than dosing anything.
By week four to six the plants start rooting and putting out new growth, and the diatoms fade as the bacterial colony and plant mass catch up to the nutrient load. This is also when carpets begin to spread and epiphytes anchor to hardscape. By month three a low-tech scape has filled the midground and a high-tech one is ready for its first hard trim. In my parameter log the tell-tale of a settling tank is nitrate stabilising — once it stops swinging week to week, the system has found its balance and the scape stops changing dramatically. Patience here is not a personality trait; it is the cheapest tool in the kit.
Matching Hardscape and Substrate to Your Livestock
This is the section most aquascaping guides skip, and it is the one that separates a tank that survives from a display that slowly kills its inhabitants. Your scape’s materials set your water chemistry, and your water chemistry has to match what lives in it. There is no neutral choice here — only a matched one or a mismatched one. Decide the livestock before the hardscape, because reversing a carbonate-leaching stone after you have planted around it is a teardown.
For a Neocaridina shrimp colony like the one I run, I want stable, moderate parameters and I avoid carbonate-rich stone that would creep KH and GH upward over months — I reach for dragon stone, lava rock, or spider wood, all close to inert, and I let an inert or buffering substrate set the baseline I want. For soft-water fish such as chili rasboras or many tetras, an active aqua-soil that gently lowers KH pairs with inert hardscape. For hard-water livestock, Seiryu’s buffering is actually a feature, not a bug. The point is the same one my hydroponics bench taught me: the water is the system, and every rock and grain of substrate is an input. Test, do not guess — see my cherry shrimp water parameters guide for the exact KH, GH and TDS ranges I hold for shrimp, and my nitrogen cycle guide for getting the biology right before any livestock goes in.
My Nano Aquascaping Sequence, Start to Finish
When people ask how I actually build a scape, this is the order, and the order matters because each step constrains the next. Skipping ahead is how scapes end up torn down. Here is the sequence I follow on every tank, low-tech or high-tech.
- Pick the style and the livestock first. These two decisions set every material choice below.
- Measure the footprint and sketch the layout dry. Mark the focal point a third of the way across.
- Dry-fit the hardscape in the empty tank, photograph it, and live with it for a day or two.
- Lay and slope the substrate — shallow front, deep back — terraced behind rock and wood so it holds.
- Set the hardscape into the substrate so it looks anchored, not perched on top.
- Plant by zone — background stems, midground epiphytes, foreground carpet — into damp substrate before filling.
- Fill slowly over a plate or bag to avoid disturbing the slope, then start the cycle.
- Run the cycle fully and only add livestock once the tank reads zero ammonia and zero nitrite.
That is the whole build. Every linked guide in this cluster expands one of these steps into the detail it deserves, but the sequence is the spine. Follow it in order and a nano scape comes together as a system rather than a series of expensive corrections.
Frequently Asked Questions
Is it harder to aquascape a nano tank than a large one?
Yes. In a small tank every rock, plant, and slope fills a large share of the visible water, so proportion and scale errors that disappear in a big aquarium are obvious in a nano. The chemistry is also less forgiving because hardscape changes parameters faster in low volume.
What is the easiest aquascaping style for a beginner nano?
A wood-and-epiphyte scape is the most forgiving. Inert hardscape like spider wood plus slow epiphytes such as Anubias and Java fern needs no CO2, modest light, and very little trimming, while still looking finished from week one.
Do I need CO2 to aquascape a nano tank?
No. Carpets and demanding stem plants benefit from pressurised CO2, but a strong hardscape scape planted with epiphytes and slow plants looks excellent without it. Decide low-tech or high-tech before you build, because they are different designs, not the same tank neglected or pampered.
How deep should substrate be in a nano aquascape?
Roughly 2-3 cm at the front rising to 5-8 cm at the back for a typical nano. Carpeting plants need about 3 cm to anchor, while epiphytes on hardscape need none. The back-to-front slope is what creates the illusion of depth.
Why does my pale aquascaping stone raise my water hardness?
Many light grey stones such as Seiryu are carbonate-rich and slowly dissolve, raising KH and GH. This is fine for hard-water livestock but a problem for soft-water shrimp. Dragon stone and lava rock are close to inert if you need stable, soft parameters.
Should I plant the tank or set the hardscape first?
Hardscape first, always. Rock and wood are the structure that gives a scape its shape; plants are added afterward to soften and fill that structure. A scape built plants-first becomes a shapeless green mass with no focal point.
Related Guides
- Aquascaping Styles for Nano Tanks
- Hardscape Rock and Wood for Nano Tanks
- Planting Foreground, Midground and Background
- Substrate Depth for Planted Nano Tanks
- Nano Tank Scape Planning Guide
- Low-Maintenance Aquascaping for Nano Tanks
- Aquascaping Tools Guide for Nano Tanks
- Low-Tech Planted Nano Tank: The Honest Beginner Guide
- Nano Tank Lighting Guide