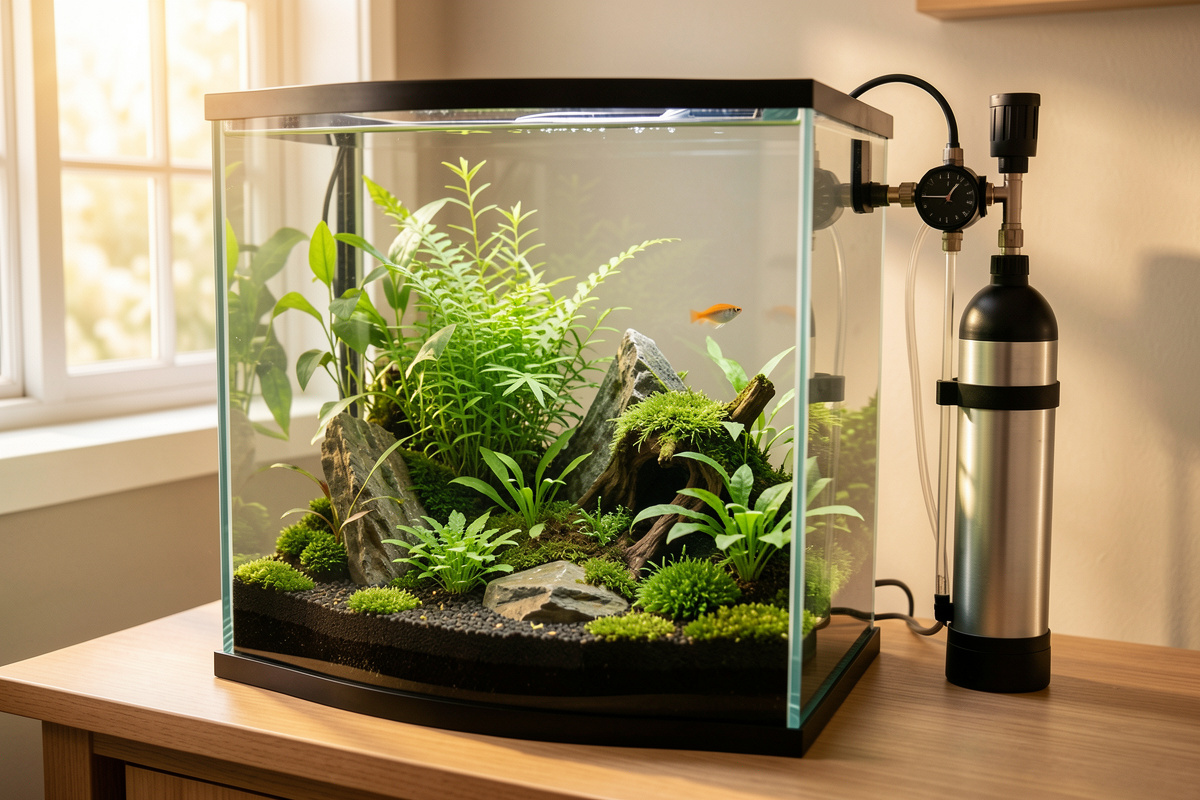
A nano tank CO2 system injects carbon dioxide into small water so plants get the one nutrient light and fertiliser cannot supply. On my high-tech 60-litre showpiece, pressurised CO2 held at a steady 25–30 ppm is the single change that took plant growth from slow to relentless. It is also the fastest way to kill a tank if you stop measuring.
That tension is the whole subject. CO2 is the most powerful lever in a planted nano and the most unforgiving, because the same small volume that makes a 20-litre tank swing on temperature swings just as hard on dissolved gas. I have run every injection method on this rack — pressurised, disposable cartridge, and yeast-bottle DIY — and logged the results the same way I log a hydroponic reservoir: one variable at a time, numbers written down, conclusions earned rather than guessed. This guide is the map of that work, and it links out to a dedicated deep-dive for every part of the chain.
Why a nano tank is the hardest place to run CO2
Small water reaches a dangerous CO2 concentration faster than any large aquarium, because the same bubble rate dissolves into a fraction of the volume. A bubble count that is gentle in a 200-litre tank can push a 20-litre nano past 40 ppm in an afternoon, and that is where livestock start gasping at the surface.
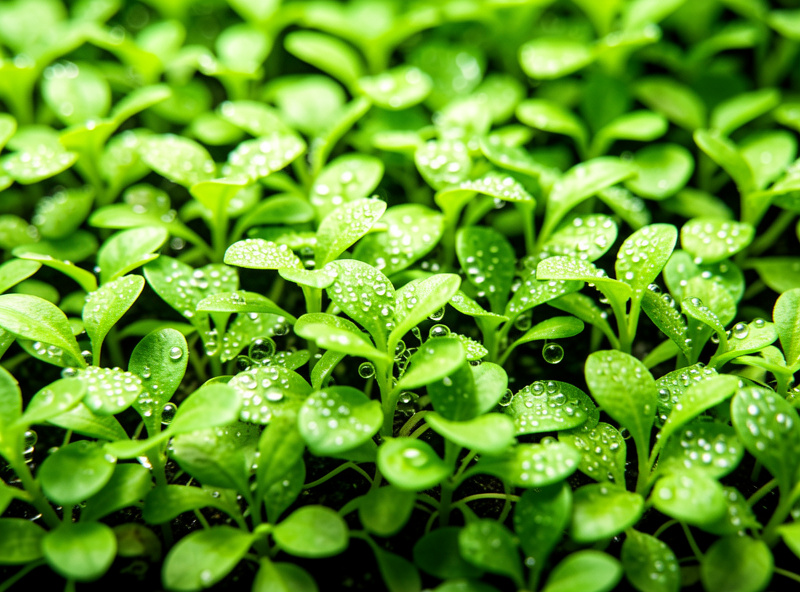
The volume math is the same one I cover in why small aquariums are harder and in my parameter swings guide: less water means less buffer against any change you make. CO2 is just the most extreme example. There is no margin for a regulator that dumps, a solenoid that sticks open overnight, or a “set it and forget it” bubble rate. The flip side is that when you respect that, a planted nano responds to CO2 faster and more visibly than a big tank ever will — you see pearling within a week, not a month. The discipline that the nano tank stability approach demands is exactly the discipline CO2 rewards.
The CO2 equipment chain, part by part
A pressurised CO2 system is a chain of small parts, and each one does a single job. Skip one and you either waste gas, risk the livestock, or get inconsistent dosing. Here is the chain in the order the gas travels, the way it sits behind my 60-litre tank.
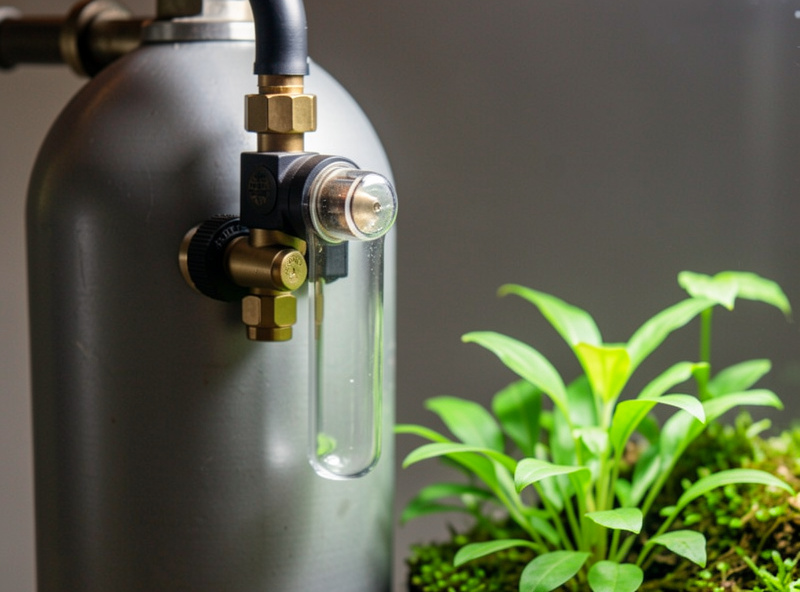
The cylinder holds the gas. For a nano I prefer a refillable 0.5–2 litre aluminium bottle over the tiny disposables — far cheaper per gram of CO2 and it sits in a cupboard out of sight. The regulator steps the cylinder’s high pressure down to a usable working pressure and is the part you should never cheap out on; a regulator that “dumps” the remaining cylinder pressure in one shot at end-of-tank is the classic gassing event. The solenoid valve is an electric on/off so CO2 runs only during the photoperiod — plants cannot use carbon in the dark, and running it around the clock just acidifies the water at night for nothing. The bubble counter lets you set and read the injection rate in bubbles per second. The check valve stops water siphoning back up the line into the regulator. The diffuser breaks the gas into a mist fine enough to dissolve before it reaches the surface. And the drop checker is your only real-time readout of the concentration actually in the water.
Each of those gets its own guide. The injection hardware and how to assemble it safely lives in my pressurised CO2 nano setup walkthrough; the part that puts gas into water is covered in the nano CO2 diffuser guide; and reading the result is the job of the drop checker guide.
Three ways to inject CO2 into a nano tank
There are three real methods for a small tank, and they trade money against control. Pressurised gas gives the most precise, stable dosing; disposable cartridge systems sit in the middle on cost and convenience; DIY yeast is the cheapest entry but the least controllable, which matters more in small water than large. I have run all three on this rack, and the right answer depends entirely on tank size, plant demand, and how much you are willing to measure.
| Method | Up-front cost | Control / stability | Best nano size | Main weakness |
|---|---|---|---|---|
| Pressurised (refillable cylinder) | High | Excellent — steady ppm all photoperiod | Any, ideal 30 L+ | Cost and one-time setup care |
| Disposable cartridge system | Medium | Good — regulator-controlled, small gas reserve | 10–40 L | Ongoing cartridge cost per gram |
| DIY yeast (sugar fermentation) | Very low | Poor — output drifts with temperature and age | Under 30 L, low demand | No solenoid; fluctuates day to day |
If you want the full reasoning rather than the summary, each method has a dedicated guide: the pressurised setup, the disposable cartridge systems, and DIY CO2 for a nano planted tank. My short version: cartridge systems are the honest sweet spot for most people on a 20–40 litre planted tank, and refillable pressurised is what you graduate to once you stop wanting to refill or replace anything.
CO2 and pH: the relationship you must understand
In a planted tank, injected CO2 lowers pH, and the size of that drop is governed almost entirely by your carbonate hardness (KH). Adding CO2 forms carbonic acid; a tank with low KH will see pH fall further and faster for the same gas, which is exactly why soft-water nanos need a gentler hand. A roughly one-point pH drop from your degassed baseline corresponds to about 30 ppm of dissolved CO2 at a stable KH.
This is the same KH/GH/pH chemistry I work through for shrimp in cherry shrimp water parameters — the meters do not care whether the water holds plants or shrimp. The practical upshot for CO2 is that the pH/KH relationship gives you a second way to estimate concentration beyond the drop checker, and a warning system: if your pH is crashing well past a one-point drop, you are over-injecting. I walk through the full chemistry, the limits of the old “pH/KH table,” and why a drop checker still wins in my CO2 and pH relationship guide. Do not run CO2 by pH alone in soft water — the swings are too sharp in a small volume.
The drop checker: your only real-time CO2 readout
A drop checker is a small glass reservoir of pH-reagent solution that hangs in the tank and changes colour with the dissolved CO2 around it — blue means too little, green means roughly in the target 25–30 ppm range, and yellow means too much. It is the one instrument that reads the actual gas in the water rather than what you set at the bubble counter, and on every CO2 tank I run it is non-negotiable.
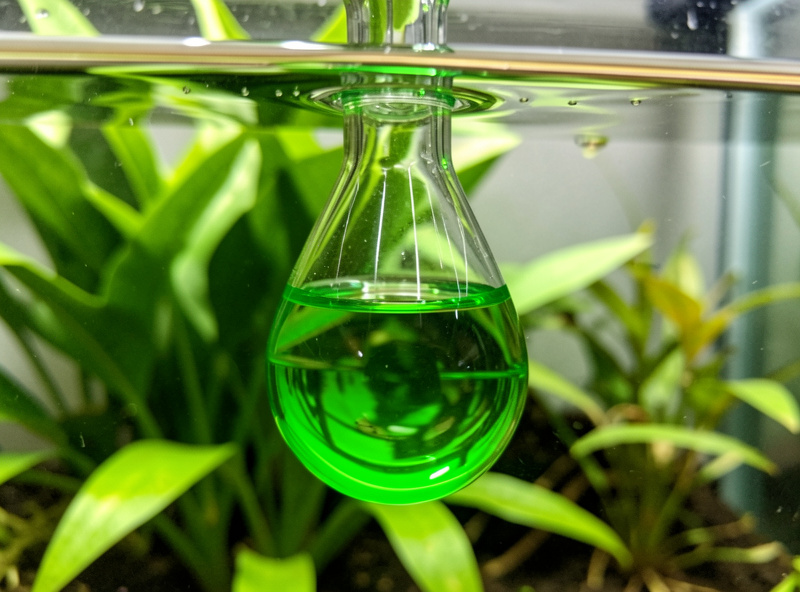
The catch most beginners miss is the lag: a drop checker reads the concentration from an hour or two ago, not this second, because the gas has to diffuse through an air gap and into the reagent. So you use it to confirm a steady state across the photoperiod, not to chase minute-to-minute changes. You also fill it with proper 4 dKH reference solution, never tank water, or the colour means nothing. The full method — placement, reagent, reading the lag, and the mistakes that make it lie — is in the drop checker guide.
Low-tech or high-tech: do you even need CO2?
Most planted nanos do not need injected CO2 at all, and saying so honestly is the difference between this site and the shops that sell you a regulator on day one. A low-tech tank stocked with undemanding plants — Anubias, Java fern, Cryptocoryne, mosses — thrives on the trace CO2 from fish respiration and surface exchange, plus modest light and root tabs. It is slower, but it is stable, cheap, and forgiving.
CO2 earns its place when you want a fast carpet, demanding stems, or that pearling, jungle look — and only when your light and fertiliser are already dialled in, because CO2 without enough light just feeds algae. I lay out the full decision, with costs and routines for each path, in CO2 for low-tech vs high-tech nano. If you are still building the basics, start with the low-tech planted nano guide and get light and fertiliser right first. CO2 is the last lever you add, not the first.
Dialling it in: my injection routine and safety
The routine that keeps a high-tech nano stable is boring on purpose. CO2 comes on via the solenoid one to two hours before lights-on so the water is already in the green band when photosynthesis starts, and switches off an hour before lights-out so the gas is not still climbing into the dark. I set the bubble rate low, check the drop checker over two or three days, and nudge up by a fraction of a bubble per second rather than chasing colour the same afternoon.
Safety is non-negotiable in small water. Always run a check valve, secure the cylinder, and never let a system run unattended on a regulator you do not trust at end-of-tank. Increased surface agitation — an air stone on a night timer, or just raising the filter return — is your emergency off-gassing if livestock ever gasp at the surface in the morning. Good water-change discipline resets the chemistry, and pairing CO2 with appropriate lighting and light spectrum is what turns gas into growth instead of green glass. When the balance is right you see it in the absence of algae, not just in the plants.
As an Amazon Associate I earn from qualifying purchases. If you are assembling a system, the parts worth buying once and well are the CO2 regulator with solenoid, a good nano glass or inline diffuser, and a drop checker with reference solution — the three parts where quality directly protects the livestock.
What a nano CO2 system actually costs to run
The sticker price of a CO2 system hides the number that matters: cost per gram of gas over a year. A refillable pressurised setup has the highest up-front spend — regulator, solenoid, cylinder, diffuser and drop checker — but the cheapest gas, because refilling a small aluminium cylinder costs a fraction of replacing disposable cartridges. Over a couple of years on my showpiece, the pressurised rig has paid for itself against what the equivalent cartridges would have cost.
Disposable cartridge systems flip that maths: low entry cost, convenient, but every spent cartridge is money gone, and a high-demand tank chews through them. They make sense if you want to try CO2 without committing, or if a refill station is genuinely inconvenient where you live. DIY yeast is almost free — sugar, yeast, a bottle — but it costs you in consistency and time, mixing a new batch every couple of weeks and tolerating output that sags as the brew ages. The right answer depends on how long you plan to run CO2: weeks of experimentation favour DIY or a cartridge kit; years of a high-tech scape favour pressurised. I treat the regulator and drop checker as buy-once-cry-once items and never economise on the parts that protect the animals.
Sizing CO2 to your nano: bubble rate by volume
Bubble rate is the wrong place to start, because a “bubble per second” is not a fixed dose — it depends on bubble size, diffuser efficiency, surface agitation, and how much your plants are actually pulling. The honest method is to set a low starting rate by tank volume, then let the drop checker, not the bubble counter, tell you when you have arrived. On a small nano I begin around one bubble every two to three seconds and creep up over a week.
As a rough starting frame: a 10–20 litre tank rarely needs more than one bubble every two seconds; a 30–40 litre planted nano often settles around one to two bubbles per second once the diffuser and flow are dialled. Those are starting points to be confirmed, never targets to hit blind. The variables that move the real concentration more than bubble count are diffuser type and water movement — a fine-mist diffuser placed under the filter return dissolves far more of each bubble than a coarse one venting at the surface. My log shows the same green drop checker reached at wildly different bubble rates on two tanks simply because one had better circulation. Measure the outcome; the input is just a knob — the same measure-don’t-guess principle the 2Hr Aquarist builds its whole dosing method around.
Flow matters as much as injection. CO2-rich water has to reach every leaf, which is why I treat circulation as part of the CO2 system, not a separate concern — the same logic as my stability approach. Dead spots starve the back of the scape no matter how many bubbles you push, and pushing more bubbles to compensate just gasses the front of the tank.
The five CO2 mistakes that kill small tanks
Almost every CO2 disaster I have seen or logged comes from one of five errors, and all five are worse in a nano because the volume gives you no time to react. First: running CO2 24/7 with no solenoid, which lets the concentration climb through the dark when plants are producing CO2 rather than consuming it — a dawn gassing waiting to happen. Second: chasing the drop checker the same afternoon, nudging the bubble rate up again and again because the colour has not moved yet, then over-shooting hours later when the lag catches up.
Third: a cheap regulator with no anti-dump behaviour, which empties the last of the cylinder in a single surge as it runs low — the classic overnight wipe-out. Fourth: adding CO2 before light and fertiliser are sorted, so the extra carbon simply feeds black beard algae instead of plants. Fifth: trusting tank water in the drop checker instead of 4 dKH reference solution, which makes the colour meaningless and gives false confidence. Every one of these is a discipline failure, not a hardware failure, and discipline is exactly what small water demands — the theme of why small aquariums are harder.
CO2, light and fertiliser: balancing the triangle
CO2 is one corner of a triangle with light and nutrients, and a planted nano only stays clean when all three are matched. Turn up any one corner past the other two and the surplus feeds algae, because algae are far quicker than plants to exploit an imbalance. This is why I insist CO2 is the last lever you add: it is the most powerful, so it does the most damage when the other two are not ready.
In practice, high light plus high CO2 plus matched fertiliser is the fast, demanding high-tech tank — relentless growth, frequent trims, and zero tolerance for neglect. Lower all three together and you have a calm low-tech tank. The failure mode is mixing levels: strong light with weak CO2, or rich CO2 with no fertiliser, both of which I have logged into green-glass messes. If you are unsure where your tank sits, the honest comparison of both paths is in CO2 for low-tech vs high-tech nano. Balance beats brute force every time in a small tank.
Building your nano CO2 system: where to start
If you are new to CO2, read in this order: decide whether you need it at all with the low-tech vs high-tech comparison, understand the CO2 and pH chemistry so the numbers mean something, then pick a method — DIY to test the waters cheaply, a cartridge system for plug-and-play, or a full pressurised build. Whatever you choose, fit a diffuser sized to your tank and confirm the result with a drop checker. Test, do not guess — the same rule that governs every tank on this rack.
One last piece of honesty: CO2 is optional, but the discipline behind it is not. The keepers whose high-tech nanos look effortless are the ones running a solenoid on a timer, a drop checker they actually read, and a parameter log that catches drift before the livestock do. Get those habits right and CO2 becomes the most rewarding upgrade in the hobby. Skip them and it becomes the most expensive way to crash a tank. The gas is powerful precisely because it is exacting, and small water has no patience for shortcuts.
Frequently Asked Questions
Do nano tanks need CO2 injection?
Most do not. A low-tech nano with Anubias, Java fern, Cryptocoryne and mosses thrives on the trace CO2 from fish respiration and surface exchange. Injected CO2 is only worth it for fast carpets or demanding stem plants, and only after light and fertiliser are already dialled in.
What is the safe CO2 level for a planted nano tank?
Aim for 25 to 30 ppm during the photoperiod, shown as a green drop checker. Above roughly 40 ppm livestock start gasping at the surface. Small water reaches dangerous levels faster than large tanks, so start low and raise the bubble rate gradually over several days.
Why does CO2 lower the pH in my aquarium?
Injected CO2 forms carbonic acid in water, which lowers pH. The size of the drop depends on carbonate hardness (KH): low-KH soft water swings further for the same gas. A roughly one-point pH drop from your degassed baseline corresponds to about 30 ppm of dissolved CO2 at a stable KH.
Which CO2 method is best for a small tank?
For a 20 to 40 litre planted nano, a disposable cartridge system is the convenient middle ground. Refillable pressurised gas gives the most precise, stable dosing and is cheapest per gram long term. DIY yeast is the cheapest entry but drifts with temperature and has no solenoid control.
Should CO2 run all day in a nano tank?
No. Plants cannot use carbon in the dark, so run CO2 only during the photoperiod via a solenoid valve. Switch it on one to two hours before lights-on and off about an hour before lights-out. Running it around the clock just acidifies the water at night and risks the livestock for no benefit.
Can CO2 kill fish or shrimp in a nano tank?
Yes, if it is over-dosed or a cheap regulator dumps the cylinder at end-of-tank. Overdosed CO2 suffocates livestock, with surface gasping in the morning as the first sign. Always use a check valve, a drop checker, and increased surface agitation as an emergency off-gassing measure.
Related Guides in This Cluster
- Pressurised CO2 for a Nano Tank: The Full Setup
- Disposable CO2 Cartridge Systems for Nano Tanks
- DIY CO2 for a Nano Planted Tank
- CO2 Diffusers for Nano Tanks
- The CO2 Drop Checker Guide
- CO2 and pH in Nano Tanks
- CO2 for Low-Tech vs High-Tech Nano